Hardware Wallets
We’re constantly working to add support for more hardware wallets in Blockstream Green. For the latest support status updates, follow the Blockstream Twitter or regularly check the table below.
Note
To share feedback or support requests, join the Blockstream Green community channel or contact support.
Supported Devices |
Support Type * |
|||||
|---|---|---|---|---|---|---|
Android (USB) |
Android (Bluetooth) |
iOS (Bluetooth) |
||||
Bitcoin |
Liquid |
Bitcoin |
Liquid |
Bitcoin |
Liquid |
|
Ledger Nano S |
✓ |
✓ ** |
x |
x |
x |
x |
Ledger Nano X |
✓ |
x |
x |
x |
✓ |
x |
Trezor One |
✓ |
x |
x |
x |
x |
x |
Trezor T |
✓ |
x |
x |
x |
x |
x |
* Support only includes 2-of-2 multisig wallets. Singlesig 1-of-1 wallets are not currently supported. ** Ledger supports a limited set of assets, check the list before receiving any asset. |
||||||
Ledger Nano S
Blockstream Green multisig wallets can be used with hardware wallets. This gives you the best of both worlds by combining Blockstream Green’s multisig security with the private key cold storage provided by a hardware wallet.
A Blockstream Green wallet associated with a hardware wallet creates a 2-of-2 multisig wallet where one key is held on your hardware wallet, and the second key is held by the Blockstream Green service. The second key serves to authorize transactions through Two-Factor Authentication.
Attention
When you create a new Bitcoin wallet with your hardware wallet on Blockstream Green, it will be different from:
Any wallet previously created on the hardware wallet
Any wallet previously created in Blockstream Green
___
Bitcoin Multisig Wallet
Create New Wallet
Prerequisites
Check the columns of this table to verify that your device supports using Green with a Ledger Nano S, if it does, install Green on your device
Make sure you have initialized your Ledger Nano S
Make sure you safely stored the recovery phrase and PIN you created when you initialized your Ledger Nano S. You will need the PIN to log into your Green multisig wallet, and the recovery phrase is needed to recover your funds in case you lose or break your Ledger Nano S
Connect Ledger Nano S to Green
Plug the hardware wallet into your Android device where Green is installed
Green will open automatically, or select Green from the pop-up menu that appears if you have multiple companion apps compatible with Ledger Nano S
Authenticate with PIN on your hardware wallet
From your hardware wallet dashboard open the Bitcoin app
Congratulations, you are now logged into your new 2-of-2 Blockstream Green wallet.
Note
If you didn’t have an existing Blockstream Green wallet associated with this hardware wallet device, a new 2-of-2 wallet will be created. If you had already logged into a Blockstream Green wallet with your hardware wallet, you will be automatically logged back into it.
Login
Connect Ledger Nano S to Green
Plug the hardware wallet into your Android device where Green is installed
Green will open automatically, or select Green from the pop-up menu that appears if you have multiple companion apps compatible with Ledger Nano S
Authenticate with PIN on your hardware wallet
From your hardware wallet dashboard open the Bitcoin app
Receive
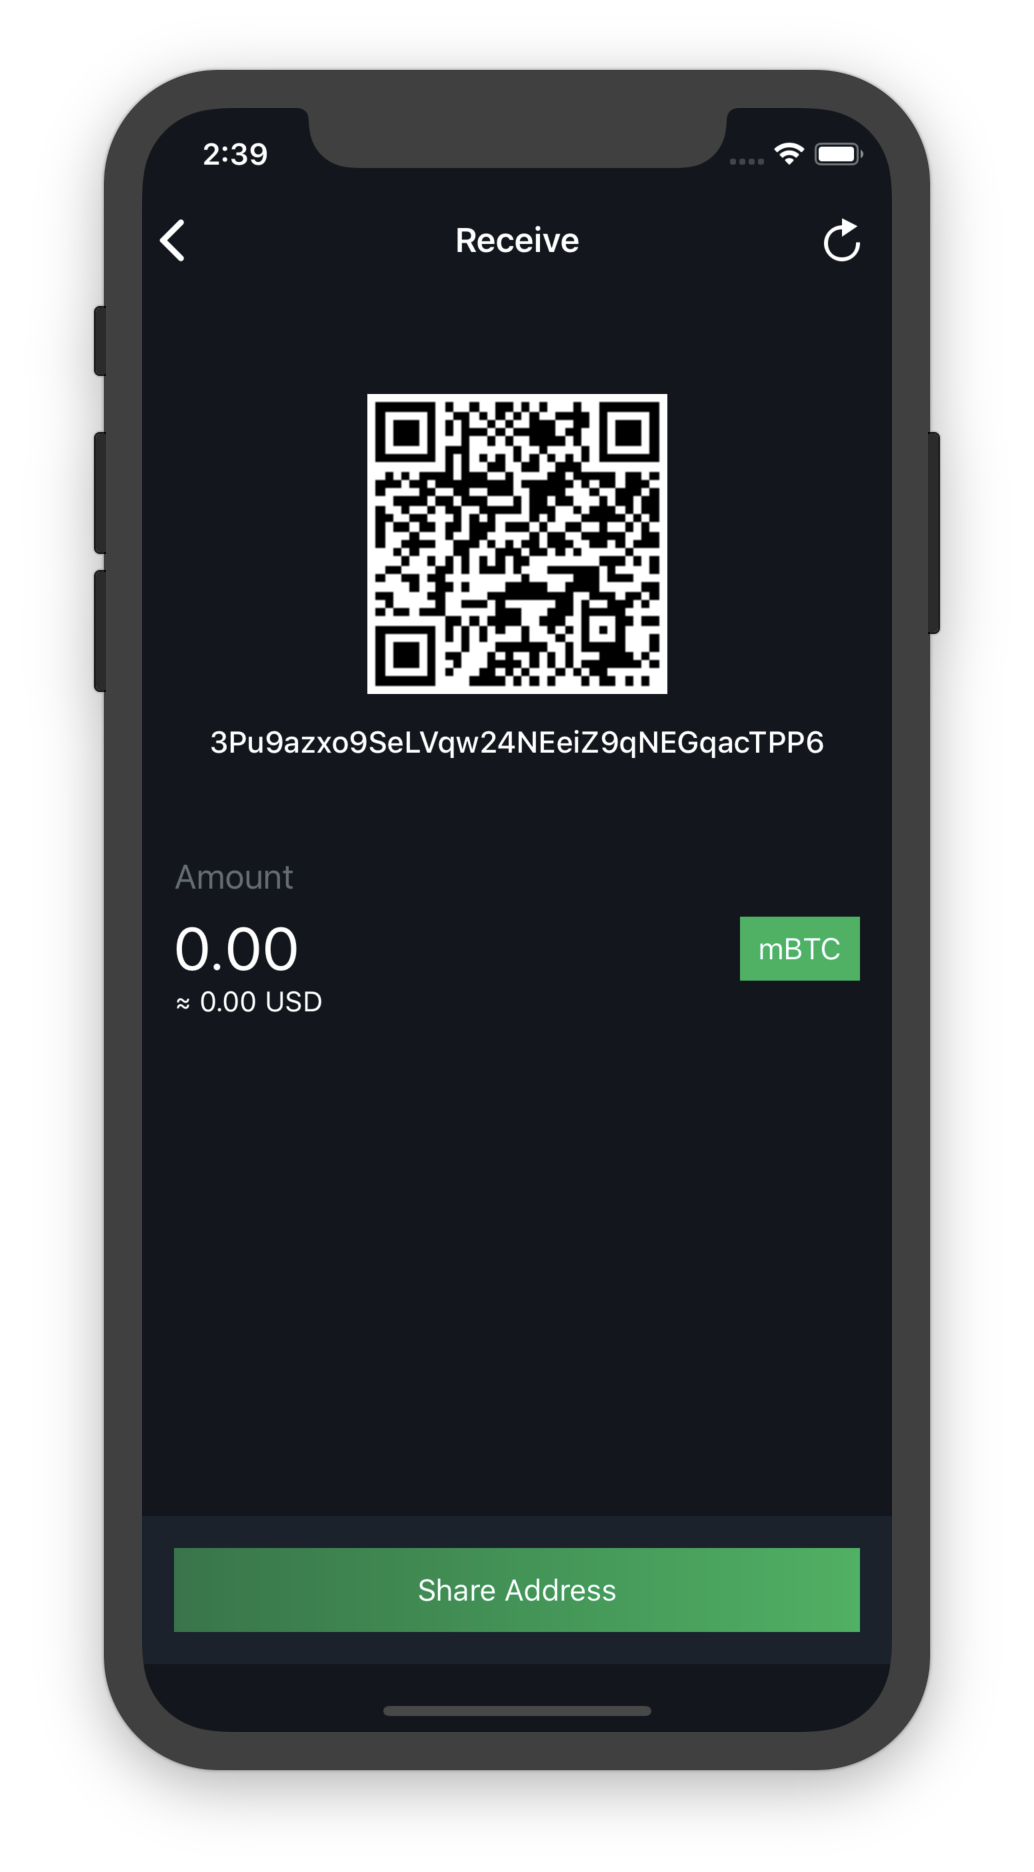
To receive Bitcoin, all you need to do is provide a receiving address to the sender.
More details about how Bitcoin receiving addresses work
- What’s a receiving address?
A Bitcoin receiving address is a string of numbers and letters. You can create a receiving address by selecting “Receive” from the main screen. Your wallet will generate a new receiving address each time you prompt it for one. While it is possible to reuse old addresses, we strongly advise against this because it lessens your privacy.
- How do I receive bitcoin on it?
Once you can see what your new address is, you’ll need to communicate it to the sender. If you need to send over a distance, a text message or email is an effective way to do it.
If you are physically beside the person who will be sending you Bitcoin, another option is to use the QR code, which the sender can scan to get the receiving address. This is really convenient if the sender is using a mobile wallet.
- Avoid mistakes!
Copy and paste addresses rather than manually type them out, and also double or triple check every time, especially for larger amounts. If the address is wrong, any bitcoins sent can become lost forever, so be very careful!
- Where will I see if I received my bitcoin?
Once someone has sent a transaction to your Blockstream Green wallet, it should appear in your transaction list page. At first, it will be labelled “unconfirmed”. At this point, you should not consider the coins to have been received, because the transaction may still get overwritten or canceled. The transaction will over time accumulate “confirmations” as new blocks are mined in the Bitcoin network. Once your transaction reaches 6 confirmations, your wallet will list it as “confirmed” and you can consider the coins received.
Send
To send a transaction, select “Send” from the main screen.
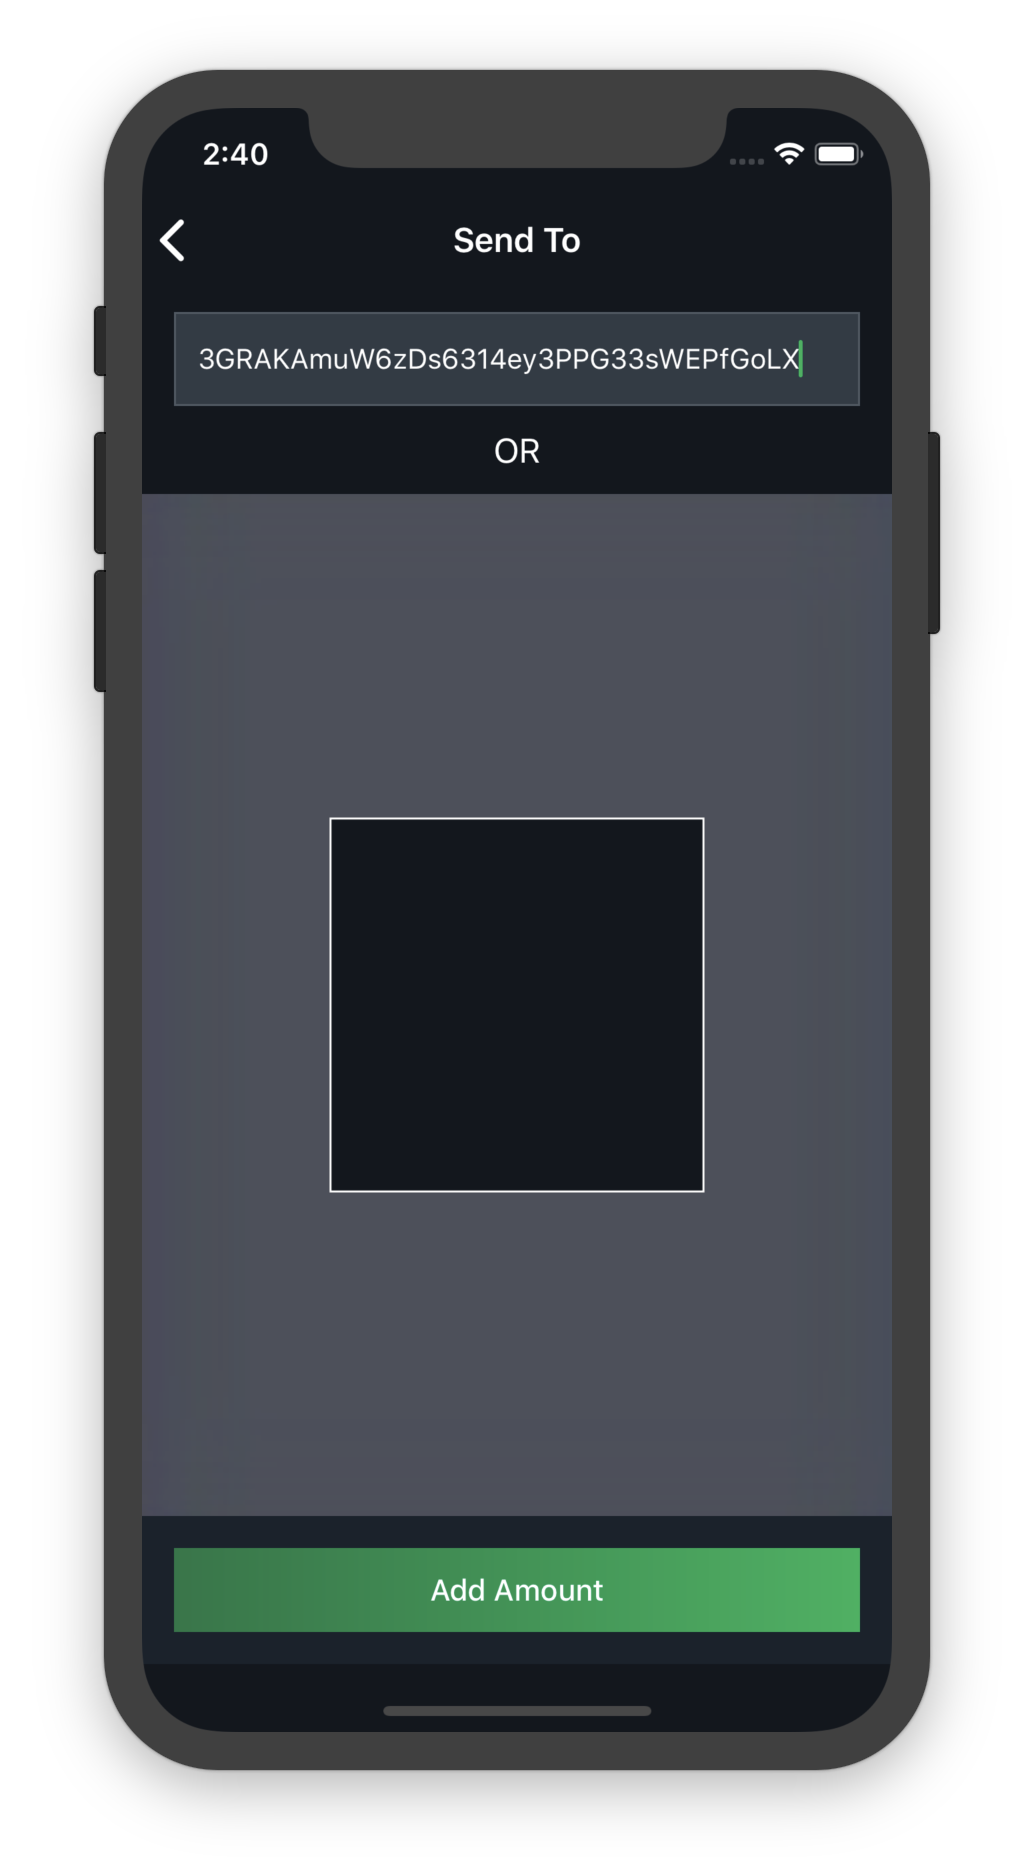
Input your recipient
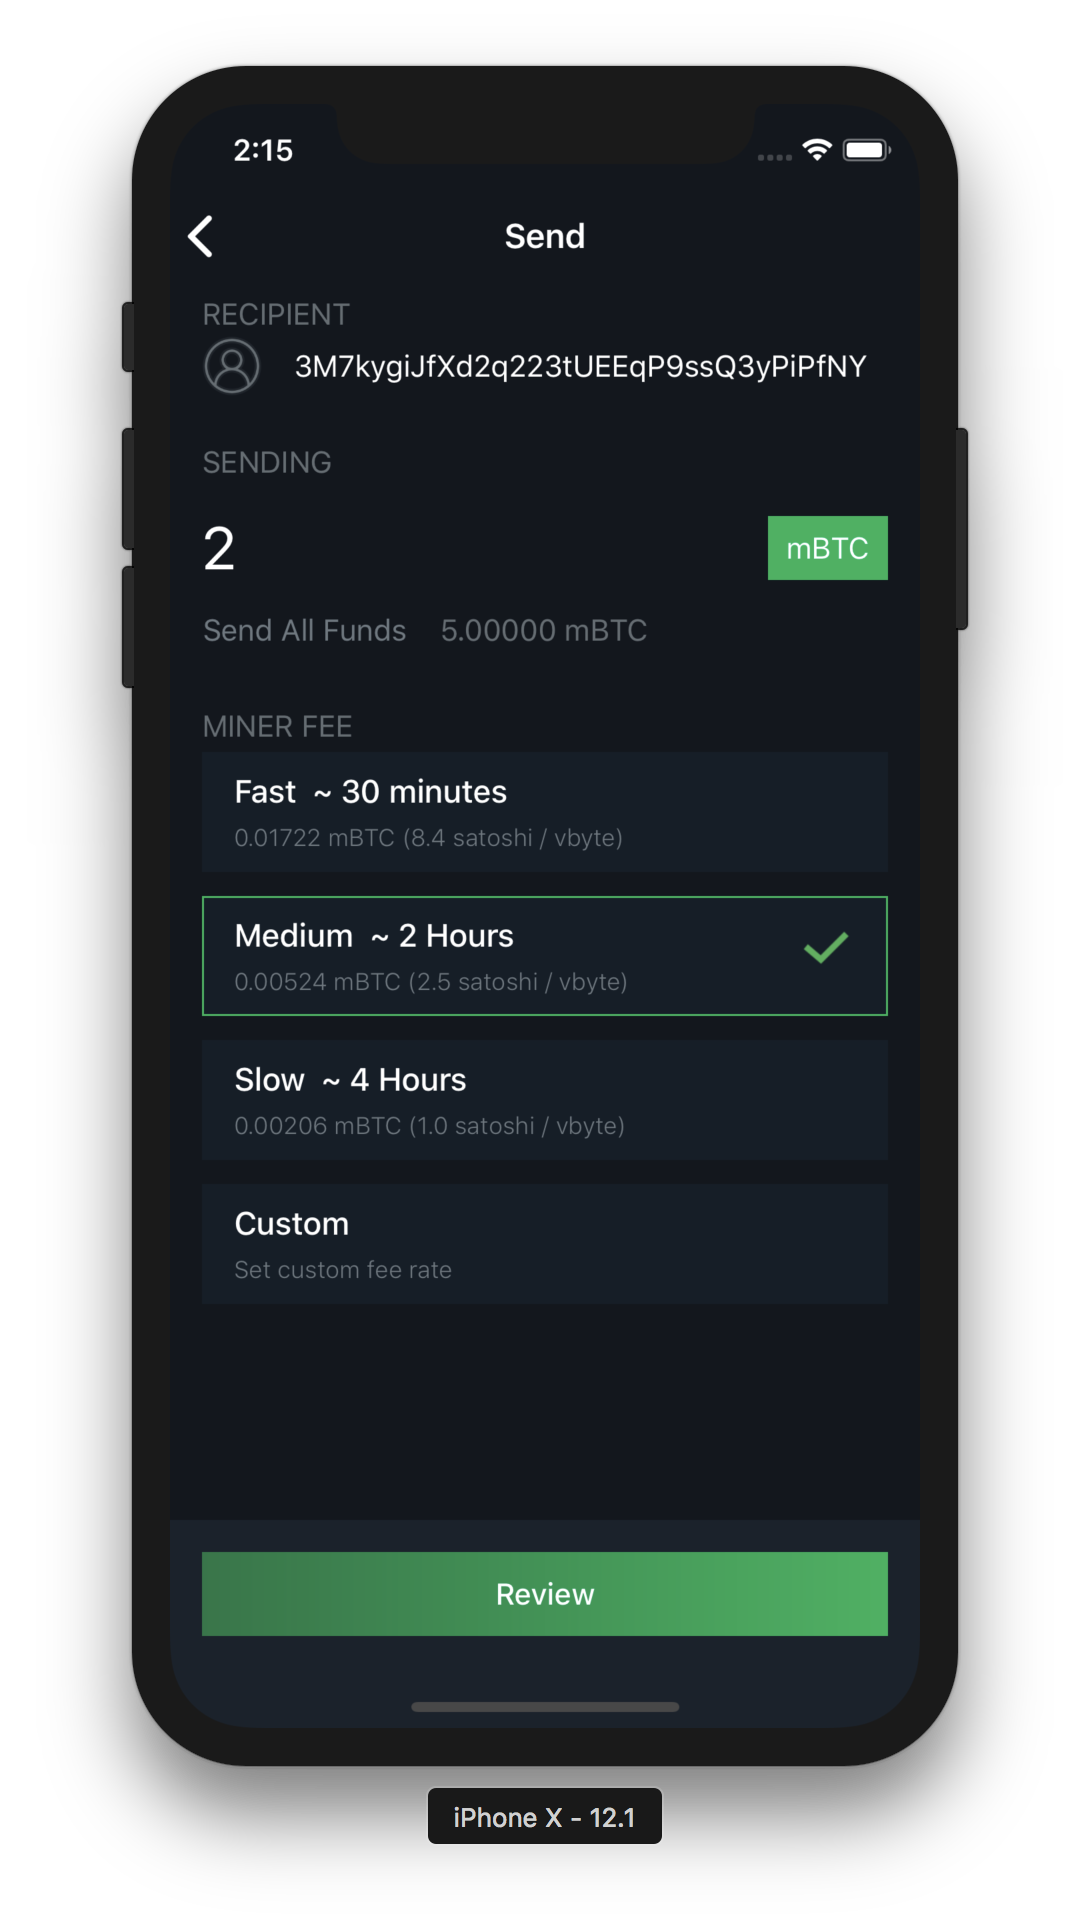
Select the amount and the desired priority
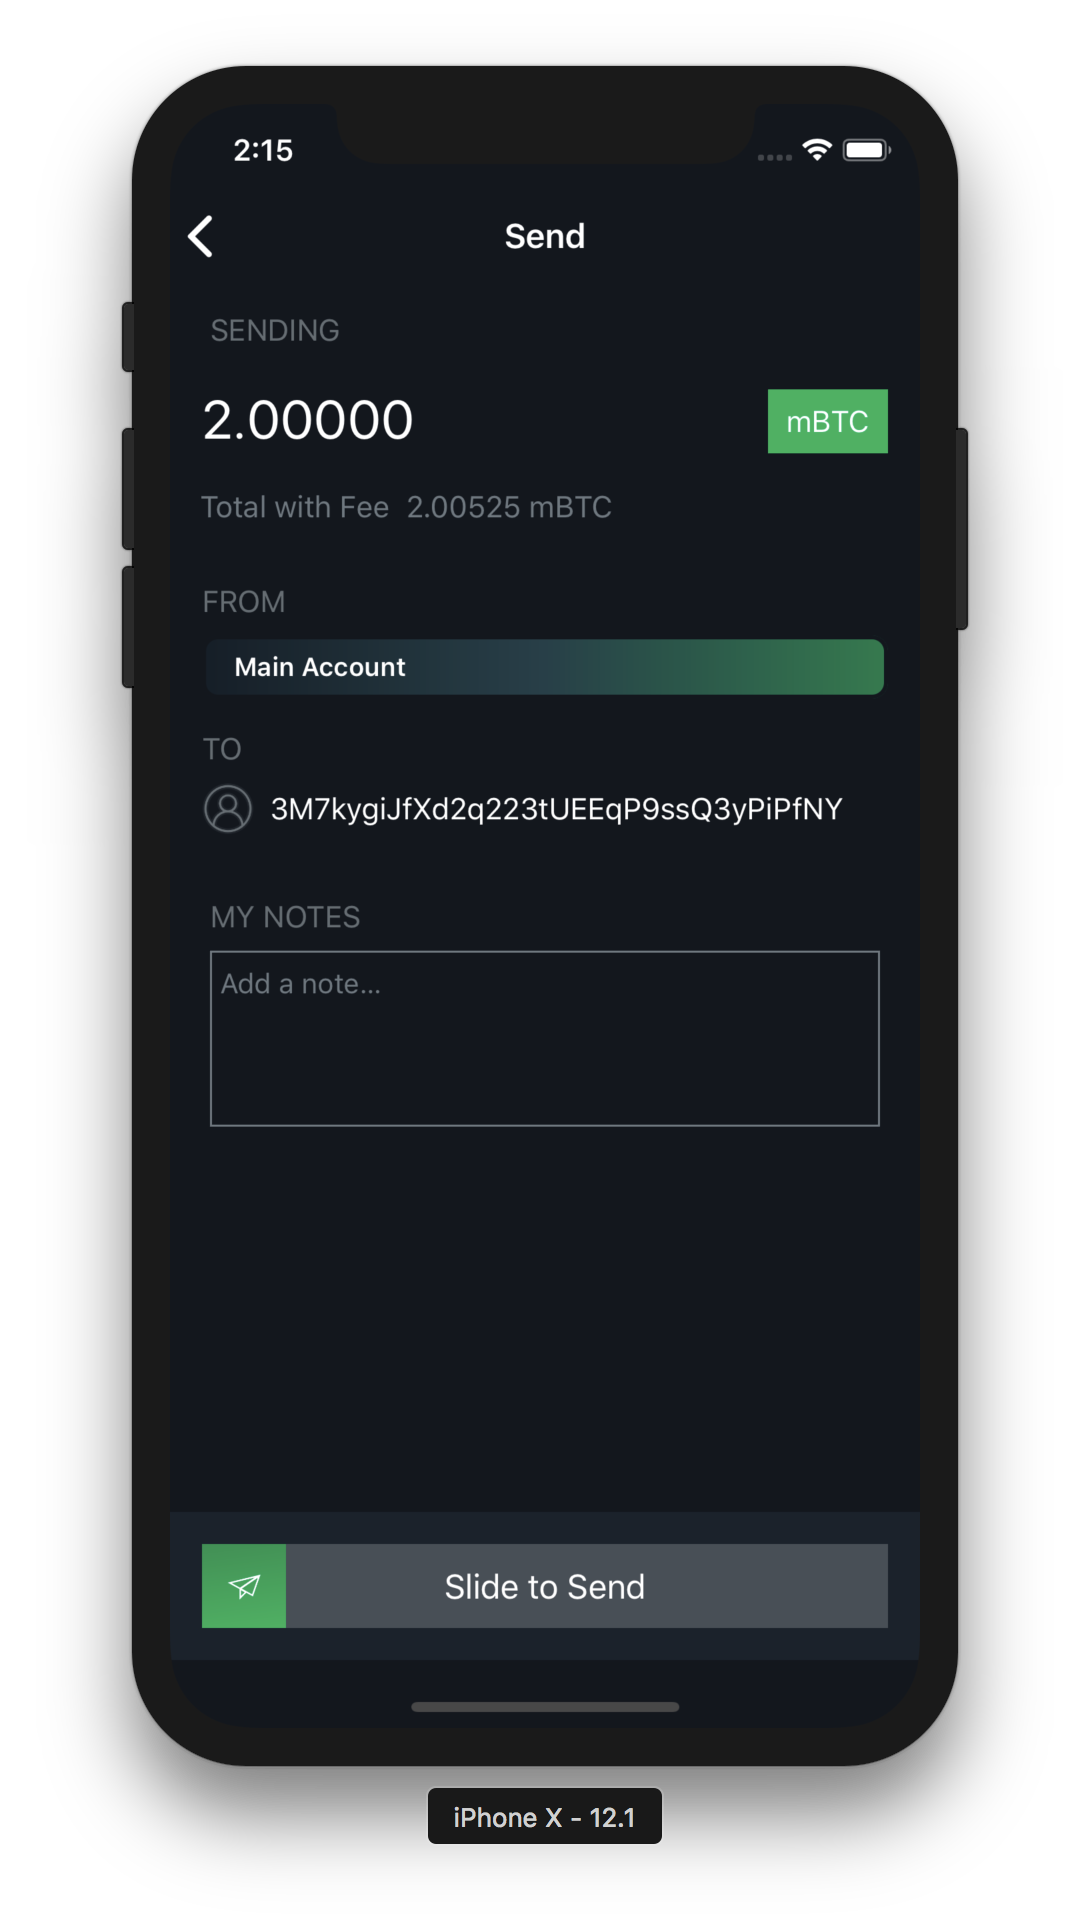
Review all the details and double check they are correct!
Don’t trust, verify the recipients and amounts on your hardware wallet
Sliding to send normally signs the transaction on your device. When your keys are stored on your hardware wallet, you will have to confirm signing the transaction from your hardware device. In order to do so, verify that the recipients and amounts displayed on your Green Companion app are the same displayed on your hardware wallet.
Tois the actual recipient of the transactionChangeis your own address where you will receive back your change
Check the verification steps in this video for reference:
Authorize the transaction with your Two-Factor-Authentication
At the end of the process, Green will prompt you to authenticate with 2FA via Google Authenticator (T-OTP), email, SMS or call, depending on what you have activated.
___
Lost or Broken Device
In the event that a hardware wallet used to log into a Blockstream Green wallet is lost or broken, there are two options for restoring your Blockstream multisig Green wallet.
Option 1 - Buy new Ledger device
Buy a new hardware wallet, possibly the same model you lost or broke, otherwise contact support to get advice on how to recover your funds
Restore on your new hardware device the recovery phrase you originally created with your lost/borken Ledger device. Follow these instructions for Nano S and these for Nano X
Finally connect your new hardware device to your Green companion app, like you’ve always done
Option 2 - Emergency restore via software signer
If you cannot buy a new Ledger device and yet you need to move funds locked on your Green multisig wallet, you can restore the recovery phrase originally created on your Ledger device onto your Green companion app.
Caution
This method ensures access to any funds, but decreases the security of the keys you once stored on your hardware wallet. If you need to use this method, we suggest you move your funds back to a new reasonably secure wallet setup as soon as you are out of your emergency situation.
Get the recovery phrase you originally created with your lost/borken Ledger device
Select the correct network, Bitcoin or Liquid
Tap on
Restore Green Walletand use your Ledger recovery phrase to proceed. During this process Green will prompt you to create a PIN to quickly access your wallet, after that you will gain access to your fundsYou can now move these funds onto a new wallet, or access your wallet via the PIN set at step 3
Liquid Multisig Wallet
Create New Wallet
Prerequisites
Check the columns of this table to verify that your device supports using Green with a Ledger Nano S, if it does, install Green on your device
Make sure you have initialized your Ledger Nano S
Make sure you safely stored the recovery phrase and PIN you created when you initialized your Ledger Nano S. You will need the PIN to log into your Green multisig wallet, and the recovery phrase is needed to recover your funds in case you lose or break your Ledger Nano S
On your hardware wallet, install the Liquid app via Ledger Live Manager
Before connecting your hardware wallet, make sure Liquid is the pre-selected network on Green
Green wallets can be created, restored or accessed on Bitcoin by default, but you can use other networks as well, like Liquid or Testnet.
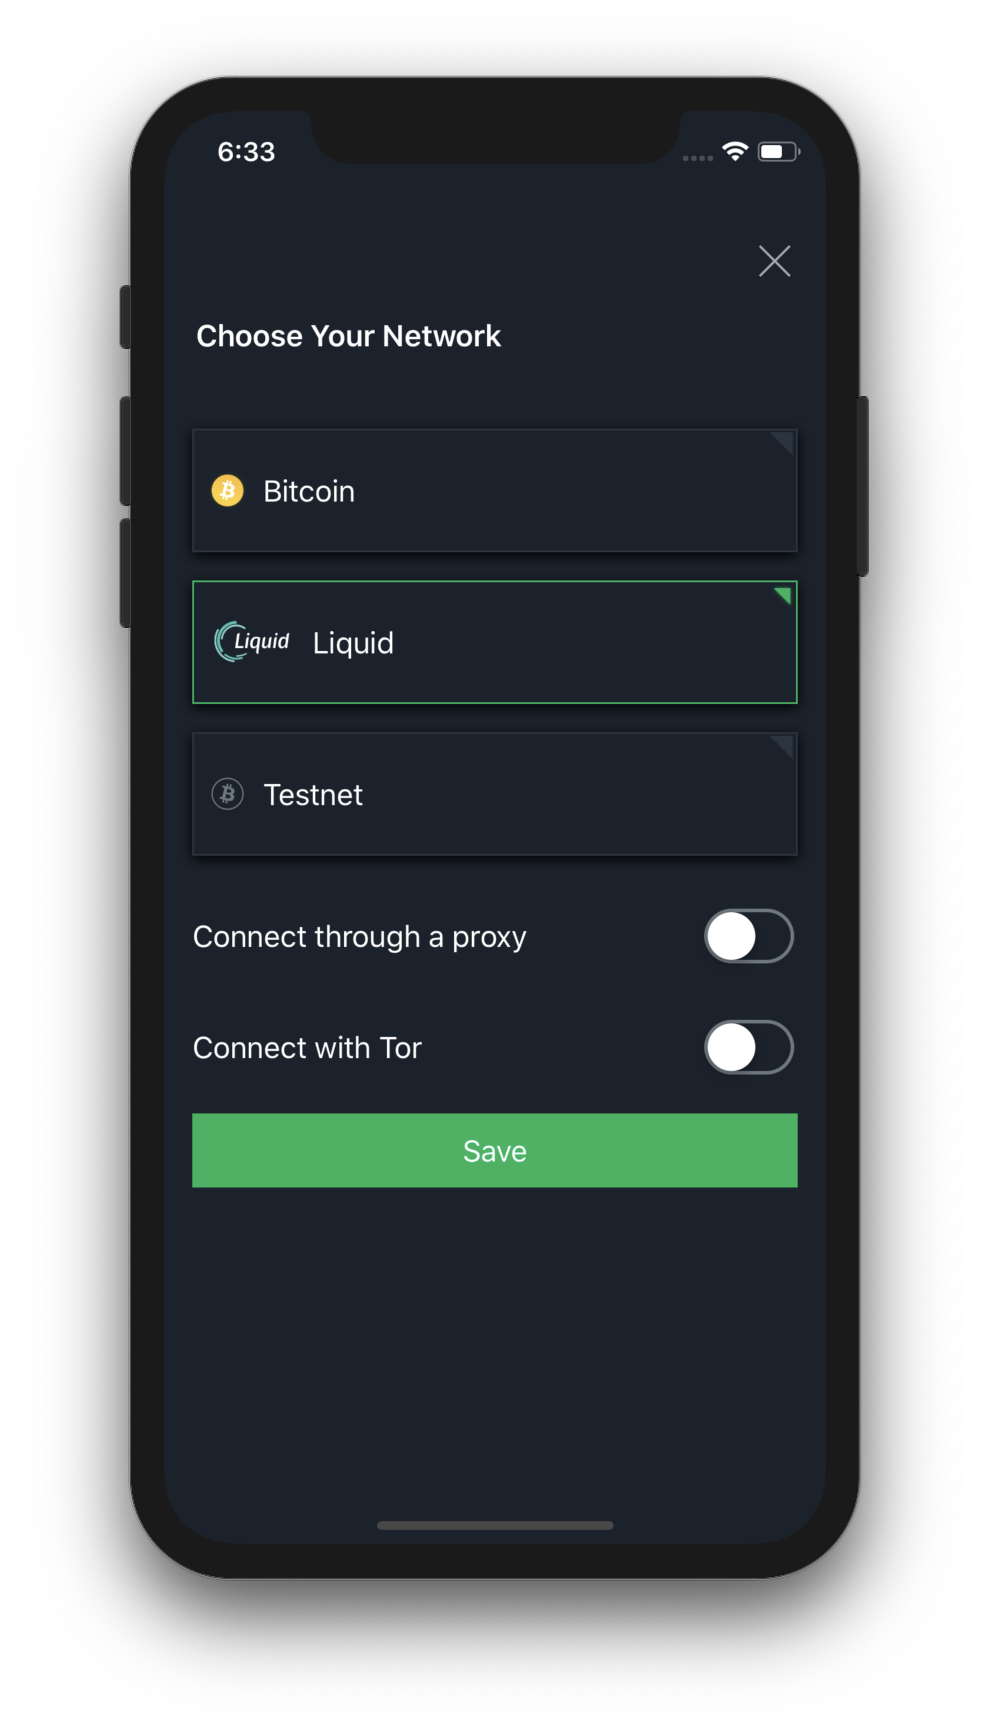
To create, restore or access a Liquid wallet, change network by tapping on the network name in the center of the landing page e.g. Bitcoin in the image below.
Note
If you have an existing wallet protected with PIN, tap on the back arrow on the top right to reach the landing page, or switch network from settings after login.

Select Liquid among the available networks and then tap on the Save button.
Connect Ledger Nano S to Green
Plug the hardware wallet into your Android device where Green is installed
Green will open automatically, or select Green from the pop-up menu that appears if you have multiple companion apps compatible with Ledger Nano S
Authenticate with PIN on your hardware wallet
From your hardware wallet dashboard open the Liquid app
Congratulations, you are now logged into your new 2-of-2 Blockstream Green wallet.
___
Login
Before connecting your hardware wallet, make sure Liquid is the pre-selected network on Green
Green wallets can be created, restored or accessed on Bitcoin by default, but you can use other networks as well, like Liquid or Testnet.
To create, restore or access a Liquid wallet, change network by tapping on the network name in the center of the landing page e.g. Bitcoin in the image below.
Note
If you have an existing wallet protected with PIN, tap on the back arrow on the top right to reach the landing page, or switch network from settings after login.

Select Liquid among the available networks and then tap on the Save button.

Connect Ledger Nano S to Green
Plug the hardware wallet into your Android device where Green is installed
Green will open automatically, or select Green from the pop-up menu that appears if you have multiple companion apps compatible with Ledger Nano S
Authenticate with PIN on your hardware wallet
From your hardware wallet dashboard open the Liquid app
Receive
Warning
Ledger currently supports spending a limited set of assets
Supported asset name |
Ticker |
|---|---|
L-BTC |
|
BTSE |
|
LCAD |
|
SAI |
|
JPYS |
|
Tether USD (Liquid) |
USDt |
You could receive any other asset, but you will be unable to spend it, unless you perform an emergency restore
Attention
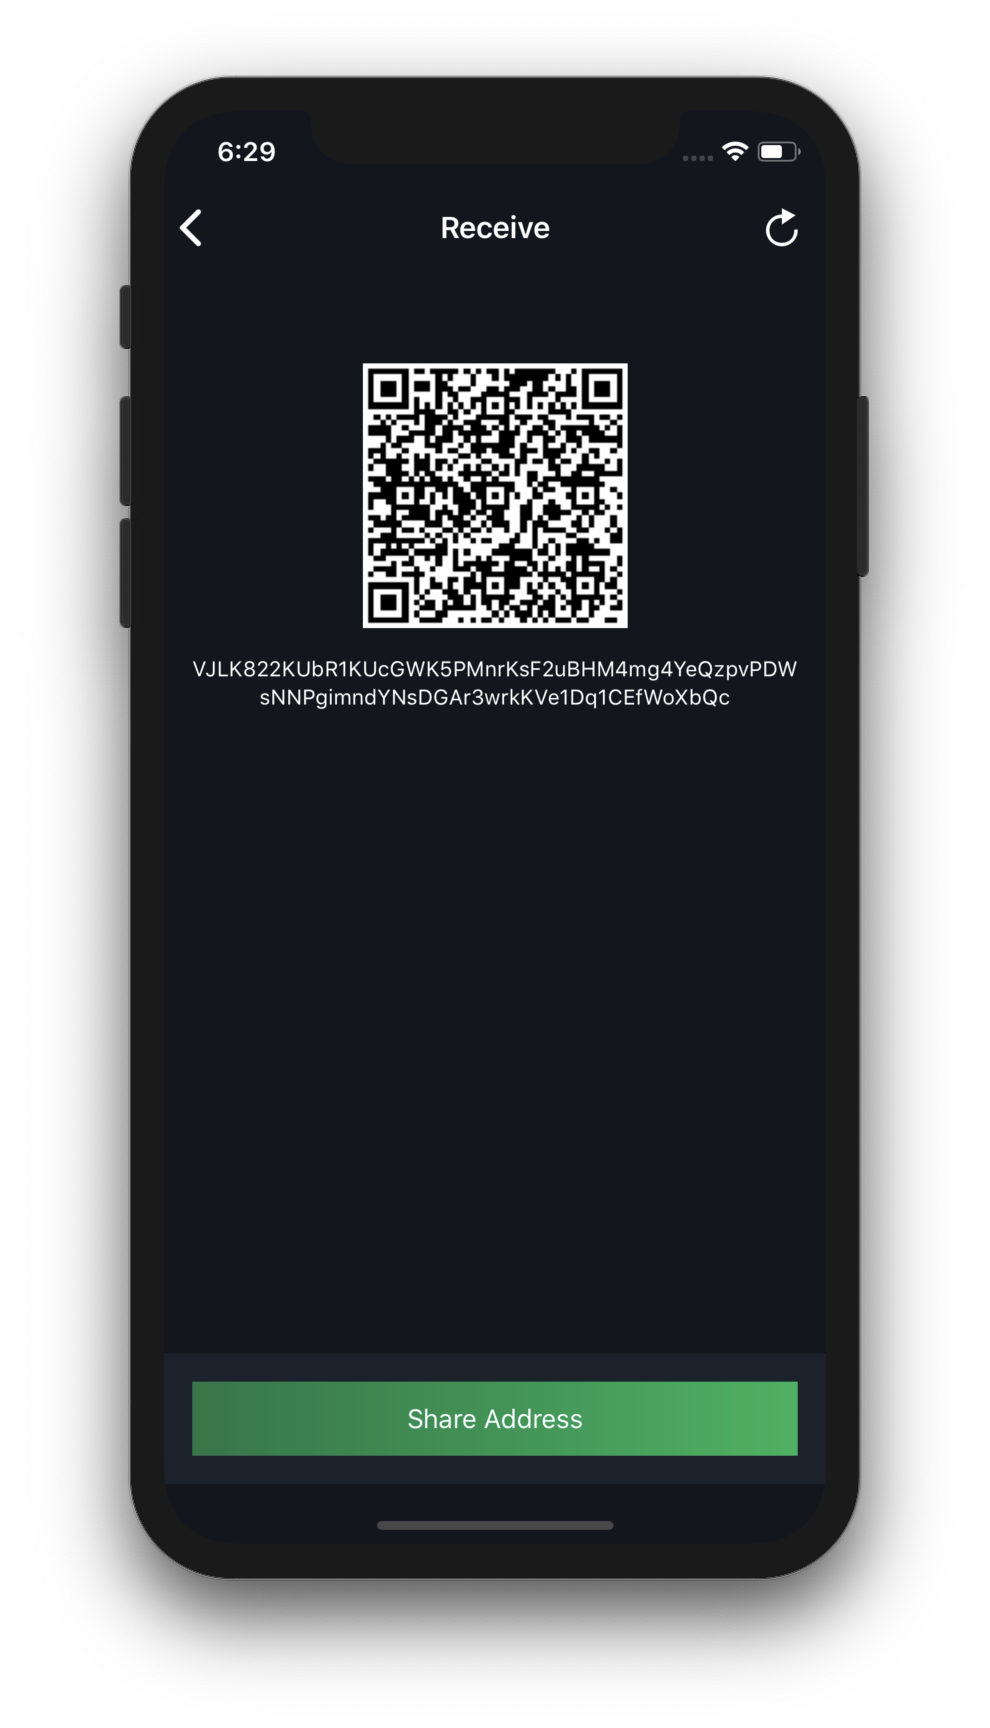
Verify the address displayed on your hardware wallet
Please verify that the address shown on your hardware wallet matches the one displayed on the Green companion app, and also confirm with the sender that they are using this same address.
To receive Liquid Bitcoin or any other Issued Asset, all you need to do is provide a receiving address to the sender.
More details about how Liquid receiving addresses work
- What’s a receiving address?
A Liquid receiving address is a string of numbers and letters. You can create a receiving address by selecting “Receive” from the main screen.
Your wallet will generate a new receiving address each time you prompt it for one. While it is possible to reuse old addresses, we strongly advise against this because it lessens your privacy.
- Does it preserve my privacy?
All addresses in Liquid are, by default, blinded using Confidential Transactions. Blinding allows to cryptographically hide the amount and type of asset being transferred from everyone, except the sending and receiving parties.
- What assets can I receive with these addresses?
You can receive any asset issued on Liquid, including, but not limiting to, these assets
- How do I receive Liquid bitcoin and other assets on these addresses?
Once you can see what your new address is, you’ll need to communicate it to the sender. If you need to send over a distance, a text message or email is an effective way to do it.
If you are physically beside the person who will be sending you Bitcoin, another option is to use the QR code, which the sender can scan to get the receiving address. This is really convenient if the sender is using a mobile wallet.
- Avoid mistakes!
Copy and paste addresses rather than manually type them out, and also double or triple check every time, especially for larger amounts. If the address is wrong, any asset sent can become lost forever, so be very careful!
- Where will I see if I received my bitcoin?
Once someone has sent a transaction to your Blockstream Green wallet, it should appear in your transaction list page. At first, it will be labelled “unconfirmed”.
Transactions on Liquid are settled with finality after 2 blocks, therefore you can consider your funds to be finally received within 2 or 3 minutes, under normal network conditions.
Send
To send a transaction, select “Send” from the main screen.
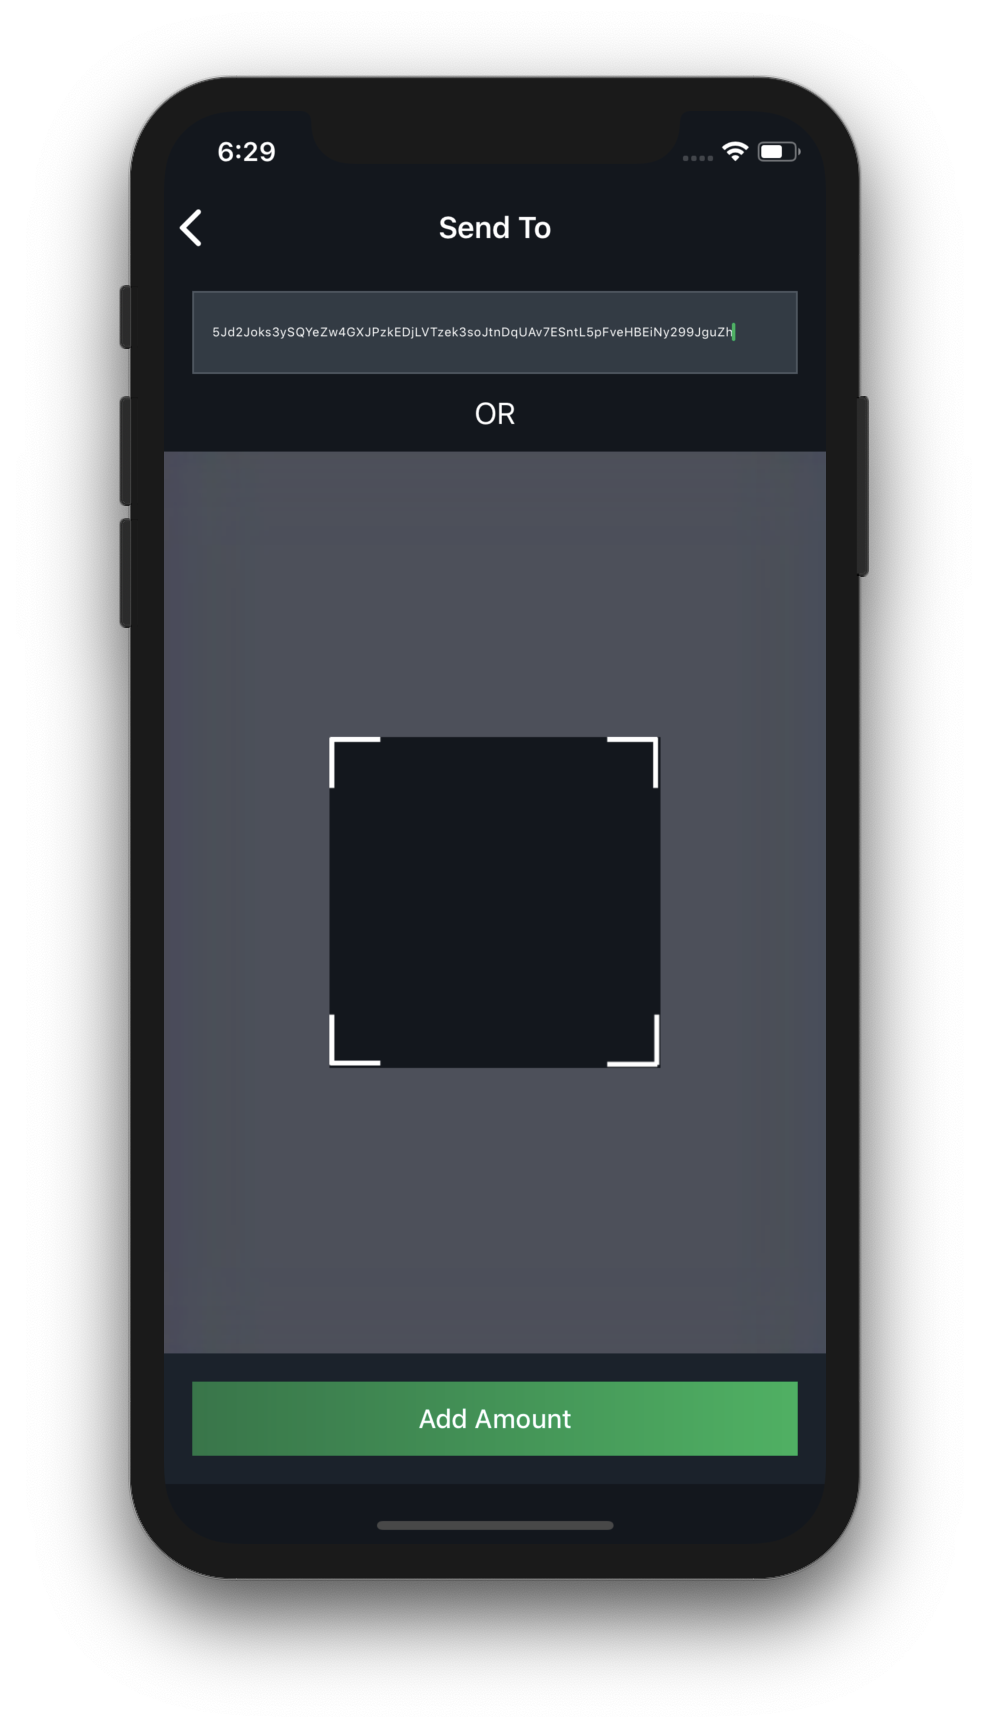
Input your recipient
You will need to get the receiving address from the recipient, and enter it (either by typing or pasting it in, or by scanning the receiver’s QR code).
Select what asset you want to send, the amount and the desired priority
Select the asset you wish to send and input the amount that you want to send, and hit send.
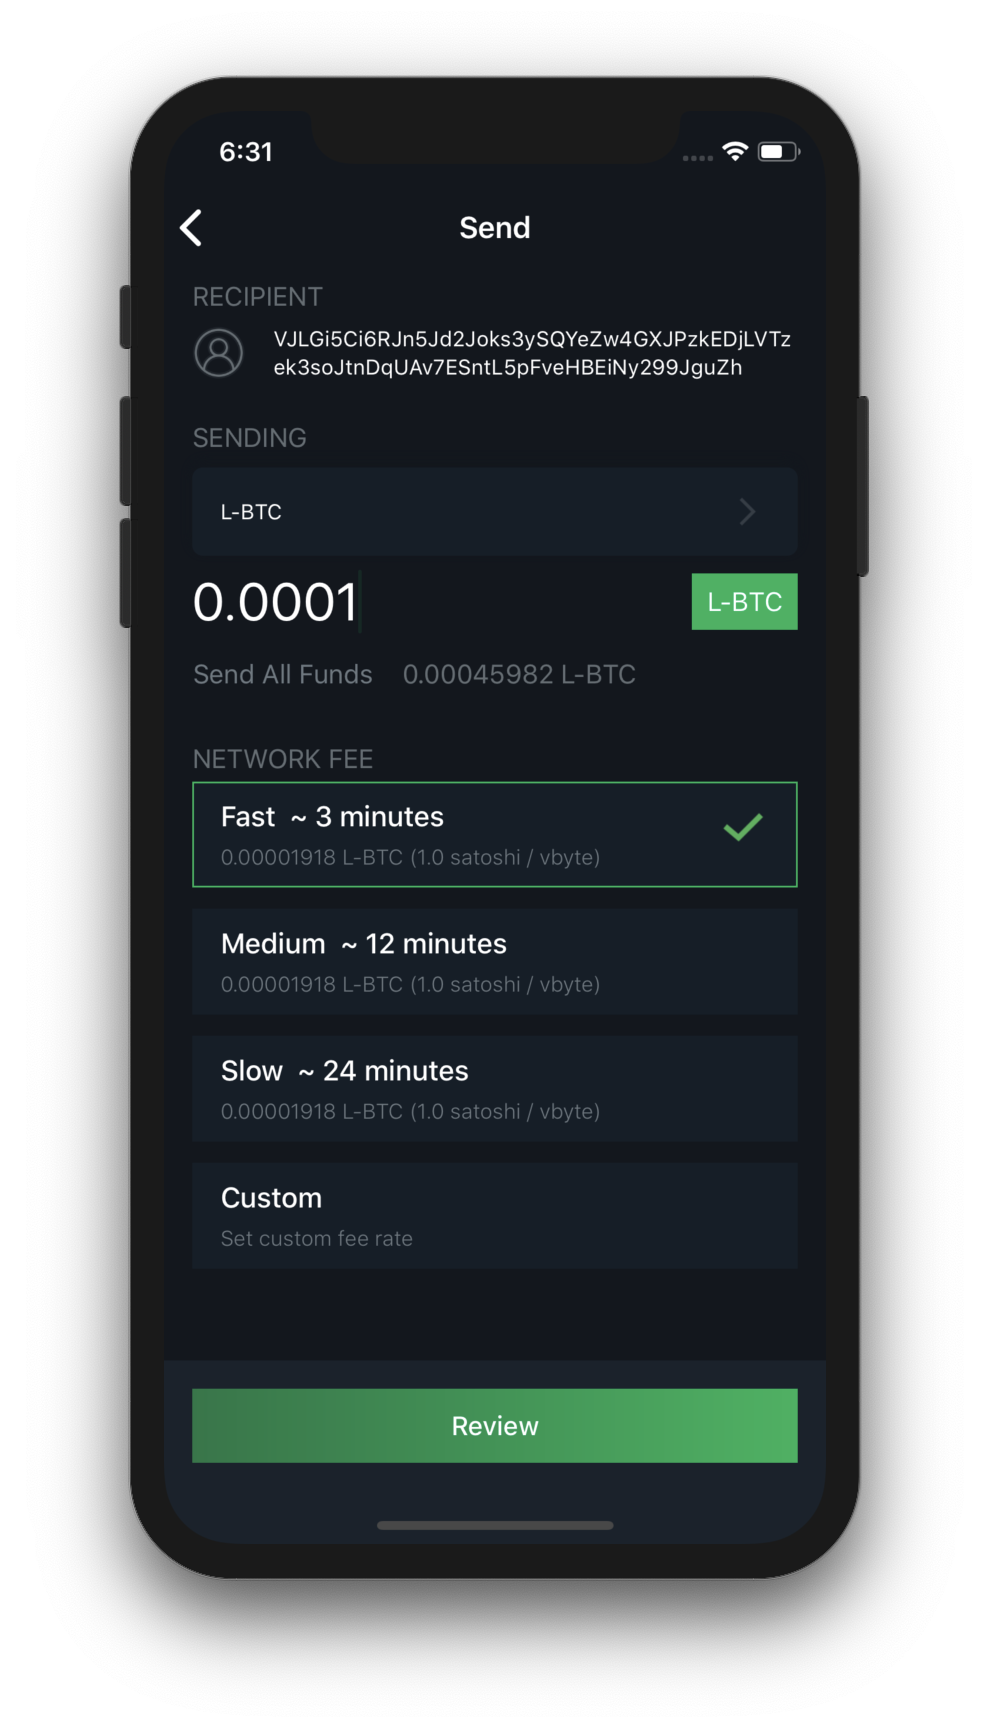
Your wallet will also automatically calculate a fee for your transaction, which is necessary to have the network accept it and to avoid Denial of Service.
Review all the details and double check they are correct!
Double check with your recipient that the address, asset, amount and fee are all correct. Liquid transactions, like Bitcoin transactions, cannot be reversed, once sent no one can help you if you made a mistake.
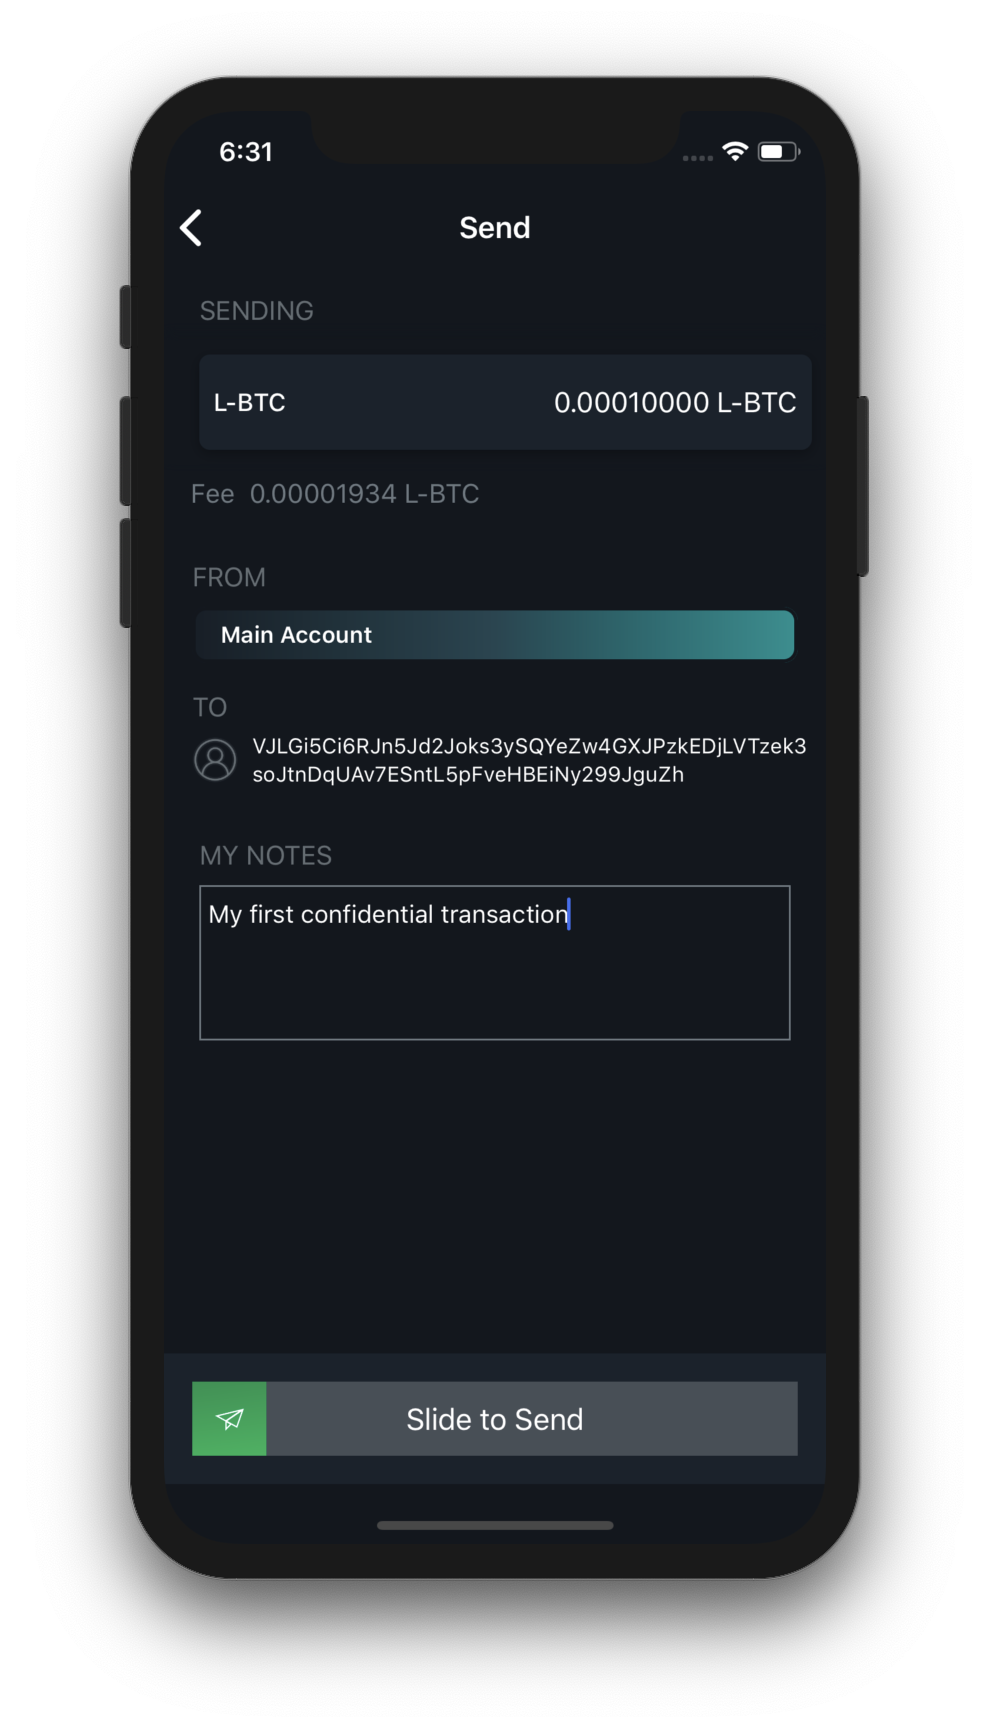
Don’t trust, verify the recipients and amounts on your hardware wallet
Sliding to send normally signs the transaction on your device. When your keys are stored on your hardware wallet, you will have to confirm signing the transaction from your hardware device. In order to do so, verify that the recipients and amounts displayed on your Green Companion app are the same displayed on your hardware wallet.
Tois the actual recipient of the transactionChangeis your own address where you will receive back your change
Check the verification steps in this video for reference:
Authorize the transaction with your Two-Factor-Authentication
At the end of the process, Green will prompt you to authenticate with 2FA via Google Authenticator (T-OTP), email, SMS or call, depending on what you have activated.
___
Lost or Broken Device
In the event that a hardware wallet used to log into a Blockstream Green wallet is lost or broken, there are two options for restoring your Blockstream multisig Green wallet.
Option 1 - Buy new Ledger device
Buy a new hardware wallet, possibly the same model you lost or broke, otherwise contact support to get advice on how to recover your funds
Restore on your new hardware device the recovery phrase you originally created with your lost/borken Ledger device. Follow these instructions for Nano S and these for Nano X
Finally connect your new hardware device to your Green companion app, like you’ve always done
Option 2 - Emergency restore via software signer
If you cannot buy a new Ledger device and yet you need to move funds locked on your Green multisig wallet, you can restore the recovery phrase originally created on your Ledger device onto your Green companion app.
Caution
This method ensures access to any funds, but decreases the security of the keys you once stored on your hardware wallet. If you need to use this method, we suggest you move your funds back to a new reasonably secure wallet setup as soon as you are out of your emergency situation.
Get the recovery phrase you originally created with your lost/borken Ledger device
Select the correct network, Bitcoin or Liquid
Tap on
Restore Green Walletand use your Ledger recovery phrase to proceed. During this process Green will prompt you to create a PIN to quickly access your wallet, after that you will gain access to your fundsYou can now move these funds onto a new wallet, or access your wallet via the PIN set at step 3
Ledger Nano X
Blockstream Green multisig wallets can be used with hardware wallets. This gives you the best of both worlds by combining Blockstream Green’s multisig security with the private key cold storage provided by a hardware wallet.
A Blockstream Green wallet associated with a hardware wallet creates a 2-of-2 multisig wallet where one key is held on your hardware wallet, and the second key is held by the Blockstream Green service. The second key serves to authorize transactions through Two-Factor Authentication.
Attention
When you create a new Bitcoin wallet with your hardware wallet on Blockstream Green, it will be different from:
Any wallet previously created on the hardware wallet
Any wallet previously created in Blockstream Green
Bitcoin Multisig Wallet
Create New Wallet
Prerequisites
Check the columns of this table to verify that your device supports using Green with a Ledger Nano X, if it does, install Green on your device
Make sure you have initialized your Ledger Nano X
Make sure you safely stored the recovery phrase and PIN you created when you initialized your Ledger Nano X. You will need the PIN to log into your Green multisig wallet, and the recovery phrase is needed to recover your funds in case you lose or break your Ledger Nano X
Connect Ledger Nano X to Green
Connect via USB
Plug the hardware wallet into your Android device where Green is installed
Green will open automatically, or select Green from the pop-up menu that appears if you have multiple companion apps compatible with Ledger Nano S
Connect via Bluetooth
Authenticate with PIN on your hardware wallet
From your hardware wallet dashboard open the Bitcoin app
Congratulations, you are now logged into your new 2-of-2 Blockstream Green wallet.
Note
If you didn’t have an existing Blockstream Green wallet associated with this hardware wallet device, a new 2-of-2 wallet will be created. If you had already logged into a Blockstream Green wallet with your hardware wallet, you will be automatically logged back into it.
Login
Connect Ledger Nano X to Green
Connect via USB
Plug the hardware wallet into your Android device where Green is installed
Green will open automatically, or select Green from the pop-up menu that appears if you have multiple companion apps compatible with Ledger Nano S
Connect via Bluetooth
Authenticate with PIN on your hardware wallet
From your hardware wallet dashboard open the Bitcoin app
Receive
To receive Bitcoin, all you need to do is provide a receiving address to the sender.

More details about how Bitcoin receiving addresses work
- What’s a receiving address?
A Bitcoin receiving address is a string of numbers and letters. You can create a receiving address by selecting “Receive” from the main screen. Your wallet will generate a new receiving address each time you prompt it for one. While it is possible to reuse old addresses, we strongly advise against this because it lessens your privacy.
- How do I receive bitcoin on it?
Once you can see what your new address is, you’ll need to communicate it to the sender. If you need to send over a distance, a text message or email is an effective way to do it.
If you are physically beside the person who will be sending you Bitcoin, another option is to use the QR code, which the sender can scan to get the receiving address. This is really convenient if the sender is using a mobile wallet.
- Avoid mistakes!
Copy and paste addresses rather than manually type them out, and also double or triple check every time, especially for larger amounts. If the address is wrong, any bitcoins sent can become lost forever, so be very careful!
- Where will I see if I received my bitcoin?
Once someone has sent a transaction to your Blockstream Green wallet, it should appear in your transaction list page. At first, it will be labelled “unconfirmed”. At this point, you should not consider the coins to have been received, because the transaction may still get overwritten or canceled. The transaction will over time accumulate “confirmations” as new blocks are mined in the Bitcoin network. Once your transaction reaches 6 confirmations, your wallet will list it as “confirmed” and you can consider the coins received.
Send
To send a transaction, select “Send” from the main screen.
Input your recipient
Select the amount and the desired priority
Review all the details and double check they are correct!
Don’t trust, verify the recipients and amounts on your hardware wallet
Sliding to send normally signs the transaction on your device. When your keys are stored on your hardware wallet, you will have to confirm signing the transaction from your hardware device. In order to do so, verify that the recipients and amounts displayed on your Green Companion app are the same displayed on your hardware wallet.
Tois the actual recipient of the transactionChangeis your own address where you will receive back your change
Check the verification steps in this video for reference:
Authorize the transaction with your Two-Factor-Authentication
At the end of the process, Green will prompt you to authenticate with 2FA via Google Authenticator (T-OTP), email, SMS or call, depending on what you have activated.
___
Lost or Broken Device
In the event that a hardware wallet used to log into a Blockstream Green wallet is lost or broken, there are two options for restoring your Blockstream multisig Green wallet.
Option 1 - Buy new Ledger device
Buy a new hardware wallet, possibly the same model you lost or broke, otherwise contact support to get advice on how to recover your funds
Restore on your new hardware device the recovery phrase you originally created with your lost/borken Ledger device. Follow these instructions for Nano S and these for Nano X
Finally connect your new hardware device to your Green companion app, like you’ve always done
Option 2 - Emergency restore via software signer
If you cannot buy a new Ledger device and yet you need to move funds locked on your Green multisig wallet, you can restore the recovery phrase originally created on your Ledger device onto your Green companion app.
Caution
This method ensures access to any funds, but decreases the security of the keys you once stored on your hardware wallet. If you need to use this method, we suggest you move your funds back to a new reasonably secure wallet setup as soon as you are out of your emergency situation.
Get the recovery phrase you originally created with your lost/borken Ledger device
Select the correct network, Bitcoin or Liquid
Tap on
Restore Green Walletand use your Ledger recovery phrase to proceed. During this process Green will prompt you to create a PIN to quickly access your wallet, after that you will gain access to your fundsYou can now move these funds onto a new wallet, or access your wallet via the PIN set at step 3
Trezor One
Blockstream Green multisig wallets can be used with hardware wallets. This gives you the best of both worlds by combining Blockstream Green’s multisig security with the private key cold storage provided by a hardware wallet.
A Blockstream Green wallet associated with a hardware wallet creates a 2-of-2 multisig wallet where one key is held on your hardware wallet, and the second key is held by the Blockstream Green service. The second key serves to authorize transactions through Two-Factor Authentication.
Attention
When you create a new Bitcoin wallet with your hardware wallet on Blockstream Green, it will be different from:
Any wallet previously created on the hardware wallet
Any wallet previously created in Blockstream Green
Bitcoin Multisig Wallet
Create New Wallet
Prerequisites
Check the columns of this table to verify that your device supports using Green with a Trezor One, if it does, install Green on your device
Make sure you have initialized your Trezor One
Make sure you safely stored the *recovery seed* and PIN you created when you initialized your Trezor One. You will need the PIN to log into your Green multisig wallet, and the recovery seed is needed to recover your funds in case you lose or break your Trezor One
Connect your Trezor to Green
Plug the hardware wallet into your Android device where Green is installed
Green will open automatically, or select Green from the pop-up menu that appears if you have multiple companion apps compatible with Trezor
Authenticate with your Trezor’s PIN
Authenticate with your hardware wallet’s PIN
To finalize the authentication, your Trezor will ask you to sign a challenge message, confirm it on your hardware wallet, to log into your Green multisig wallet
Congratulations, you are now logged into your new 2-of-2 Blockstream Green wallet.
Note
If you didn’t have an existing Blockstream Green wallet associated with this hardware wallet device, a new 2-of-2 wallet will be created. If you had already logged into a Blockstream Green wallet with your hardware wallet, you will be automatically logged back into it.
Login
Connect your Trezor to Green
Plug the hardware wallet into your Android device where Green is installed
Green will open automatically, or select Green from the pop-up menu that appears if you have multiple companion apps compatible with Trezor
Authenticate with your Trezor’s PIN
Authenticate with your hardware wallet’s PIN
To finalize the authentication, your Trezor will ask you to sign a challenge message, confirm it on your hardware wallet, to log into your Green multisig wallet
Receive
To receive Bitcoin, all you need to do is provide a receiving address to the sender.

More details about how Bitcoin receiving addresses work
- What’s a receiving address?
A Bitcoin receiving address is a string of numbers and letters. You can create a receiving address by selecting “Receive” from the main screen. Your wallet will generate a new receiving address each time you prompt it for one. While it is possible to reuse old addresses, we strongly advise against this because it lessens your privacy.
- How do I receive bitcoin on it?
Once you can see what your new address is, you’ll need to communicate it to the sender. If you need to send over a distance, a text message or email is an effective way to do it.
If you are physically beside the person who will be sending you Bitcoin, another option is to use the QR code, which the sender can scan to get the receiving address. This is really convenient if the sender is using a mobile wallet.
- Avoid mistakes!
Copy and paste addresses rather than manually type them out, and also double or triple check every time, especially for larger amounts. If the address is wrong, any bitcoins sent can become lost forever, so be very careful!
- Where will I see if I received my bitcoin?
Once someone has sent a transaction to your Blockstream Green wallet, it should appear in your transaction list page. At first, it will be labelled “unconfirmed”. At this point, you should not consider the coins to have been received, because the transaction may still get overwritten or canceled. The transaction will over time accumulate “confirmations” as new blocks are mined in the Bitcoin network. Once your transaction reaches 6 confirmations, your wallet will list it as “confirmed” and you can consider the coins received.
Send
To send a transaction, select “Send” from the main screen.
Input your recipient
Select the amount and the desired priority
Review all the details and double check they are correct!
Don’t trust, verify the recipients and amounts on your hardware wallet
Sliding to send normally signs the transaction on your device. When your keys are stored on your hardware wallet, you will have to confirm signing the transaction from your hardware device. In order to do so, verify that the recipients and amounts displayed on your Green Companion app are the same displayed on your hardware wallet.
Check the verification steps in this video for reference:
Authorize the transaction with your Two-Factor-Authentication
At the end of the process, Green will prompt you to authenticate with 2FA via Google Authenticator (T-OTP), email, SMS or call, depending on what you have activated.
___
Lost or Broken Device
In the event that a hardware wallet used to log into a Blockstream Green wallet is lost or broken, there are two options for restoring your Blockstream multisig Green wallet.
Option 1 - Buy new Trezor device
Buy a new hardware wallet, possibly the same model you lost or broke, otherwise contact support to get advice on how to recover your funds
Restore on your new hardware device the recovery seed you originally created with your lost/borken Trezor device. Follow these instructions for Trezor One and these for Trezor T
Finally connect your new hardware device to your Green companion app, like you’ve always done
Option 2 - Emergency restore via software signer
If you cannot buy a new Trezor device and yet you need to move funds locked on your Green multisig wallet, you can restore the recovery seed originally created on your Ledger device onto your Green companion app.
Caution
This method ensures access to any funds, but decreases the security of the keys you once stored on your hardware wallet. If you need to use this method, we suggest you move your funds back to a new reasonably secure wallet setup as soon as you are out of your emergency situation.
Get the recovery seed you originally created with your lost/borken Trezor device
Select the correct network, Bitcoin or Liquid
Tap on
Restore Green Walletand use your Trezor recovery seed to proceed. During this process Green will prompt you to create a PIN to quickly access your wallet, after that you will gain access to your fundsYou can now move these funds onto a new wallet, or access your wallet via the PIN set at step 3
Trezor T
Blockstream Green multisig wallets can be used with hardware wallets. This gives you the best of both worlds by combining Blockstream Green’s multisig security with the private key cold storage provided by a hardware wallet.
A Blockstream Green wallet associated with a hardware wallet creates a 2-of-2 multisig wallet where one key is held on your hardware wallet, and the second key is held by the Blockstream Green service. The second key serves to authorize transactions through Two-Factor Authentication.
Attention
When you create a new Bitcoin wallet with your hardware wallet on Blockstream Green, it will be different from:
Any wallet previously created on the hardware wallet
Any wallet previously created in Blockstream Green
Bitcoin Multisig Wallet
Create New Wallet
Prerequisites
Check the columns of this table to verify that your device supports using Green with a Trezor T, if it does, install Green on your device
Make sure you have initialized your Trezor T
Make sure you safely stored the *recovery seed* and PIN you created when you initialized your Trezor One. You will need the PIN to log into your Green multisig wallet, and the recovery seed is needed to recover your funds in case you lose or break your Trezor One
Connect your Trezor to Green
Plug the hardware wallet into your Android device where Green is installed
Green will open automatically, or select Green from the pop-up menu that appears if you have multiple companion apps compatible with Trezor
Authenticate with your Trezor’s PIN
Authenticate with your hardware wallet’s PIN
To finalize the authentication, your Trezor will ask you to sign a challenge message, confirm it on your hardware wallet, to log into your Green multisig wallet
Congratulations, you are now logged into your new 2-of-2 Blockstream Green wallet.
Note
If you didn’t have an existing Blockstream Green wallet associated with this hardware wallet device, a new 2-of-2 wallet will be created. If you had already logged into a Blockstream Green wallet with your hardware wallet, you will be automatically logged back into it.
Login
Connect your Trezor to Green
Plug the hardware wallet into your Android device where Green is installed
Green will open automatically, or select Green from the pop-up menu that appears if you have multiple companion apps compatible with Trezor
Authenticate with your Trezor’s PIN
Authenticate with your hardware wallet’s PIN
To finalize the authentication, your Trezor will ask you to sign a challenge message, confirm it on your hardware wallet, to log into your Green multisig wallet
Receive
To receive Bitcoin, all you need to do is provide a receiving address to the sender.

More details about how Bitcoin receiving addresses work
- What’s a receiving address?
A Bitcoin receiving address is a string of numbers and letters. You can create a receiving address by selecting “Receive” from the main screen. Your wallet will generate a new receiving address each time you prompt it for one. While it is possible to reuse old addresses, we strongly advise against this because it lessens your privacy.
- How do I receive bitcoin on it?
Once you can see what your new address is, you’ll need to communicate it to the sender. If you need to send over a distance, a text message or email is an effective way to do it.
If you are physically beside the person who will be sending you Bitcoin, another option is to use the QR code, which the sender can scan to get the receiving address. This is really convenient if the sender is using a mobile wallet.
- Avoid mistakes!
Copy and paste addresses rather than manually type them out, and also double or triple check every time, especially for larger amounts. If the address is wrong, any bitcoins sent can become lost forever, so be very careful!
- Where will I see if I received my bitcoin?
Once someone has sent a transaction to your Blockstream Green wallet, it should appear in your transaction list page. At first, it will be labelled “unconfirmed”. At this point, you should not consider the coins to have been received, because the transaction may still get overwritten or canceled. The transaction will over time accumulate “confirmations” as new blocks are mined in the Bitcoin network. Once your transaction reaches 6 confirmations, your wallet will list it as “confirmed” and you can consider the coins received.
Send
To send a transaction, select “Send” from the main screen.
Input your recipient
Select the amount and the desired priority
Review all the details and double check they are correct!
Don’t trust, verify the recipients and amounts on your hardware wallet
Sliding to send normally signs the transaction on your device. When your keys are stored on your hardware wallet, you will have to confirm signing the transaction from your hardware device. In order to do so, verify that the recipients and amounts displayed on your Green Companion app are the same displayed on your hardware wallet.
Check the verification steps in this video for reference:
Authorize the transaction with your Two-Factor-Authentication
At the end of the process, Green will prompt you to authenticate with 2FA via Google Authenticator (T-OTP), email, SMS or call, depending on what you have activated.
___
Lost or Broken Device
In the event that a hardware wallet used to log into a Blockstream Green wallet is lost or broken, there are two options for restoring your Blockstream multisig Green wallet.
Option 1 - Buy new Trezor device
Buy a new hardware wallet, possibly the same model you lost or broke, otherwise contact support to get advice on how to recover your funds
Restore on your new hardware device the recovery seed you originally created with your lost/borken Trezor device. Follow these instructions for Trezor One and these for Trezor T
Finally connect your new hardware device to your Green companion app, like you’ve always done
Option 2 - Emergency restore via software signer
If you cannot buy a new Trezor device and yet you need to move funds locked on your Green multisig wallet, you can restore the recovery seed originally created on your Ledger device onto your Green companion app.
Caution
This method ensures access to any funds, but decreases the security of the keys you once stored on your hardware wallet. If you need to use this method, we suggest you move your funds back to a new reasonably secure wallet setup as soon as you are out of your emergency situation.
Get the recovery seed you originally created with your lost/borken Trezor device
Select the correct network, Bitcoin or Liquid
Tap on
Restore Green Walletand use your Trezor recovery seed to proceed. During this process Green will prompt you to create a PIN to quickly access your wallet, after that you will gain access to your fundsYou can now move these funds onto a new wallet, or access your wallet via the PIN set at step 3
